EZOfficeInventory supports multiple login options. These include Google Account, Microsoft Account, LDAP and SAML providers. You can configure which login options to give to users from Settings → Company Settings → Authentication. In this post, we’ll discuss SAML.
Users in your organization can access EZOfficeInventory through SAML. No need for your users to remember separate credentials for EZOfficeInventory. To start, enable SAML Integration from Settings → Add Ons.
1. What is SAML?
Security Assertion Markup Language (SAML) is an XML standard that enables a user to log on once to affiliated but separate websites. SAML creates end points that give an organization’s users a single URL to sign in and select the applications they are authorized to use. This provides an additional level of security and simplifies user authentication.
One of the main components of SAML include assertions which are : – Authentication assertion validates the user’s identity. – Attribute assertion contains specific information about the user. – Authorization assertion identifies what the user is authorized to do.
2. Why implement SAML?
Reasons include usability, directory integration and security. A user can access applications with a single click and allows to launch apps from SSO portals. In terms of security, SAML eliminates the use of passwords, centralizes access control and prevents illegal or unnecessary access from former employees.
3. How SAML works?
SAML SSO works by authenticating a user against the company’s identity provider, say OneLogin or Okta. It transfers the user’s data from one destination to another i.e. from identity provider to the service provider. In this case, EZOfficeInventory is your service provider.
Your identity provider authenticates the user by creating an XML document containing user’s credentials and email address. It then signs it using the certificate and sends back the information to EZOfficeInventory.
Some of the Identity Providers supported by EZOfficeInventory are: – OneLogin – Okta – Centrify – Simplify – Auth0
4. Configuring an Identity Provider for EZOfficeInventory
Here, we will be using OneLogin as an example, which provides SSO and identity management for cloud based applications. With OneLogin, users can enable enterprise-grade SSO over the cloud, allowing all end-users to connect with included SaaS services. For other providers, the steps are similar.
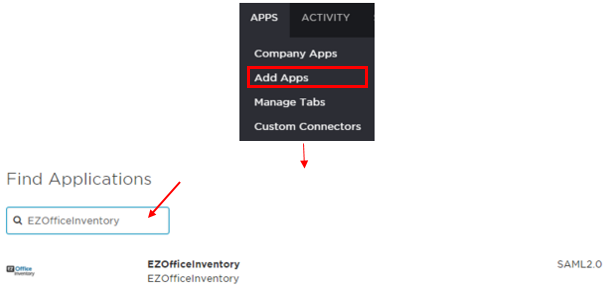
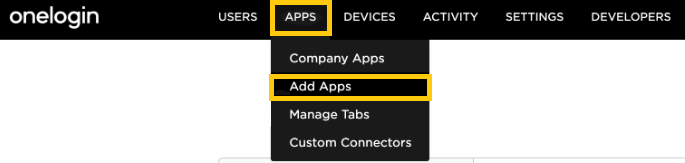
1. Adding the App Find ‘EZOfficeInventory’ from the OneLogin page, go to Apps → Add Apps → Find Applications.
Click ‘Save’ and your OneLogin account is ready to be integrated with EZOfficeInventory app. From the Company Apps, you can view all saved applications in your OneLogin account.
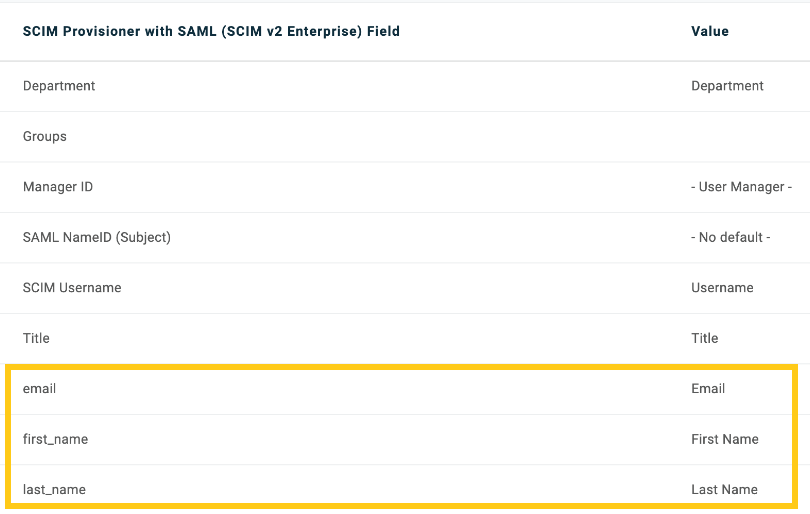
2. Making sure users have the correct attributes Your SAML users should have the attributes for first and last name as well as email address, which are required by EZOfficeInventory to retrieve and validate users.
Make sure that the SAML attribute names added in EZOfficeInventory are exactly the same as the ones used within your identity provider – there should be no inconsistencies or typos. For example, if your SAML attribute for last Name is last_name, it should be entered as exactly the same in EZOfficeinventory:
Below we have highlighted attributes in OneLogin and replicated those in EZOfficeInventory.
If you already have these attributes configured in your identity provider, you can also copy and paste them into EZOfficeInventory to ensure accuracy.
Note: Incorrectly configured attribute names will result in failure to log in. The attributes are used to verify the existence of the user accounts on both platforms.
5. Configuring EZOfficeInventory for SAML
Once you have set up an EZOfficeInventory app on your preferred SAML identity provider, configure the settings in EZOfficeInventory from Settings → Add Ons → SAML Integration. Again, we have used OneLogin as an example.
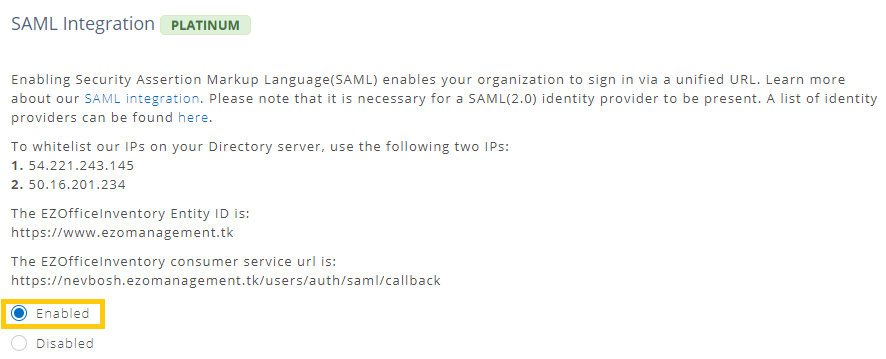
A. Whitelisting the IPs on SAML Some identity providers require IPs to be whitelisted. Make sure that the following two IPs are whitelisted in your SAML settings: 1. 54.221.243.145 2. 50.16.201.234
B. Add EZOfficeInventory consumer service URL to your SAML Settings The EZOfficeInventory consumer service url can be obtained from Settings → Add Ons → SAML Integration: https://<Your Company Subdomain>.ezofficeinventory.com/users/auth/saml/callback
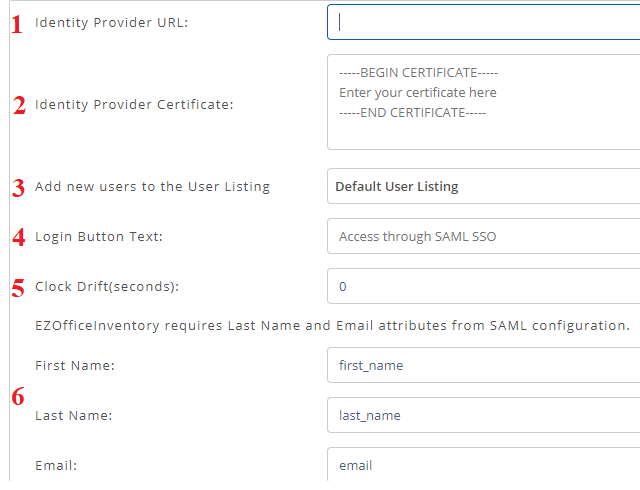
C. Fill in the configuration settings The following information needs to be configured in your EZOfficeInventory’s account (see image to identify the fields):
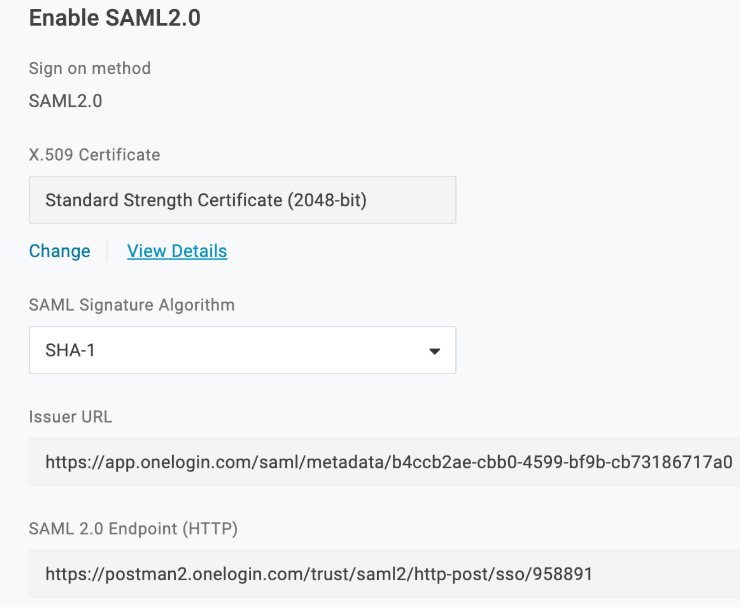
1. Unique Identity Provider URL:Find and copy your Identity Provider URL from Apps → Company Apps → EZOfficeInventory → SSO tab → SAML 2.0 Endpoint (HTTP) (see the image below). You will be required to paste this link in ‘Identity Provider URL’ field while configuring EZOfficeInventory for SAML Integration.
2. Identity Provider X.509 Certificate: Unique for every account owner, this certificate is provided by the identity provider. In OneLogin, find and copy your X.509 certificate from Apps → Company Apps → EZOfficeInventory → SSO tab → X.509 Certificate (see image above). EZOfficeInventory will use the certificate to validate the response from your identity provider letting the user to login in using SAML.
Note: Make sure to follow the below format for the certificate when pasting it in the certificate field so EZOfficeInventory validates your Identity provider’s certificate without any error. It’s as follows: —–BEGIN CERTIFICATE—– your certificate details here —–END CERTIFICATE—–
3. Adding new users to the User Listing: This is only available if you have User Listings enabled from Company Settings → Access Control. If you don’t use User Listings, skip to the next field. Your users who do not exist as members in EZOfficeInventory but access the system using SAML will be auto created in EZOfficeInventory, and will be assigned to User Listing. ‘No User Listing’ gives staff users visibility only into the items checked out to them. Users get full visibility in ‘Default User Listing’ selection
4. Label Login Button Text: By default it’s labeled as ‘Access through SAML SSO’. You can rename it to any text preferable to you e.g. Access using Acme Corp Login.
5. Clock Drift: A delay of a few seconds in situations when different time zones are involved to ensure that the response generated by a server remains valid.
6. Attributes required for SAML configuration: Last Name and Email attributes need to be present for EZOfficeInventory. These attributes/parameters should be sent over to EZOfficeInventory from your identity provider. In OneLogin, they can be viewed from Apps → Company Apps → EZOfficeInventory → Parameters. Also, map these parameters in EZOfficeInventory. If your Last Name attribute in SAML is last_name, then fill in ‘last_name’ against the Last Name field. Same goes for the Email.
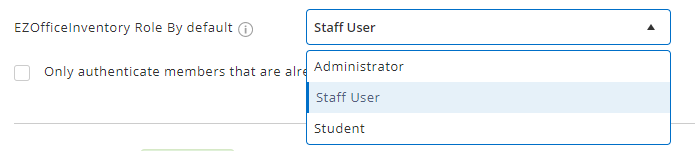
7. EZOfficeInventory Role by Default: Users can also map custom roles to SAML by selecting the relevant role from the dropdown. For instance, the additional Custom Role in the example below is the Student role:
8. Scroll down to the end of the Add Ons page in EZOfficeInventory settings, and click ‘Update’. You now have a SAML enabled EZOfficeInventory account.
6. Setting up custom SAML in Onelogin
In some instances, the EZOfficeInventory app may not appear on the OneLogin store. In such circumstances, we suggest setting up custom SAML. Here’s how you can do just that. Begin by logging into your Onelogin account.
From the Applications dropdown menu, click ‘Add Apps’.
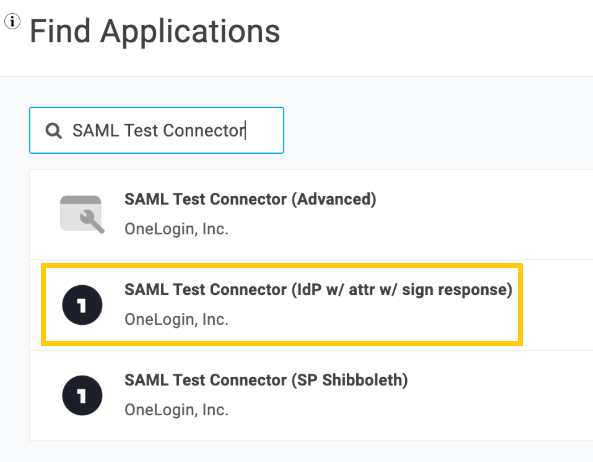
In the Find Applications section, search for SAML Test Connector. Select SAML Test Connector (IdP w/ attr w/ sign response) from the search results, as highlighted below:
Edit the Display Name as you wish and click Save.
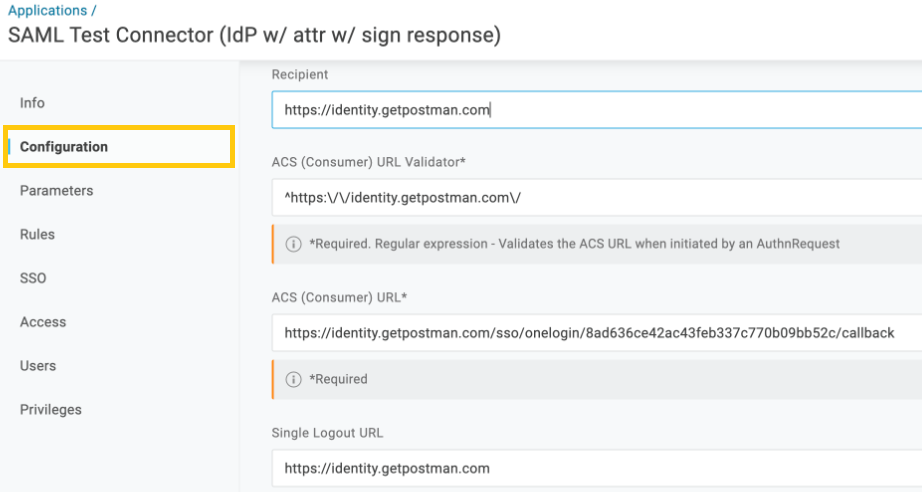
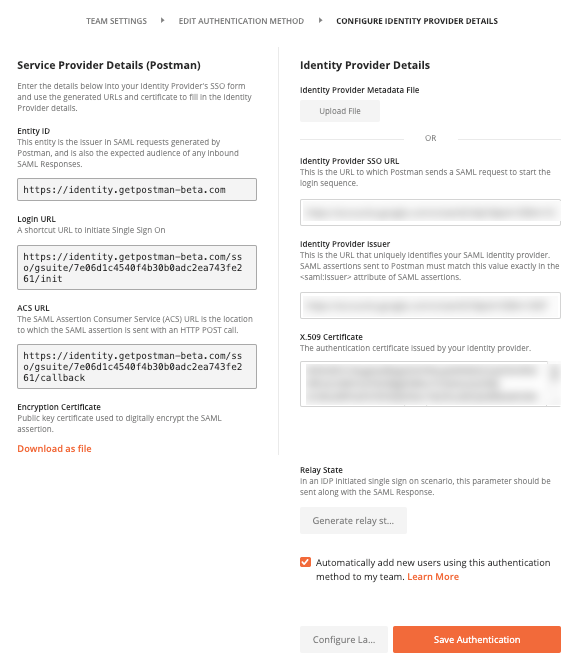
This will redirect you to the Info tab. Now open the Configuration tab and enter your Postman service provider details. You can find these details from the Postman Edit Team Details page. From the Postman service provider details, you need to copy the Entity ID, ACS URL, and Single Logout URL. The EntityID goes in the Recipient field and ACS URL in *ACS (Consumer) URL.
Set the ACS(Consumer) URL Validator to the value illustrated in the image above. Make sure that you enter https://identity.getpostman.com/ in the Single Logout URL field. In the parameters field, you need to paste this string: ^https:\/\/identity.getpostman.com\/. Once you’re done, don’t forget to click Save.
Next, move to the SSO tab in Onelogin. Here, copy values of the Identity Provider SSO URL, SAML 2.0 Endpoint (HTTP), and X.509 Certificate. You’ll have to click on View Details to copy the X.509 certificate.
Once you have copied all the values, you have to paste them into the corresponding fields in the Postman Identity Provider Details screen. Once you’re done copying the values in Identity Provider Details on the Postman page, Generate/Regenerate the relay state and select ‘Automatically add new users using this authentication method to my team’. Finally, don’t forget to hit Save Authentication to finish the process.
7. Login Experience
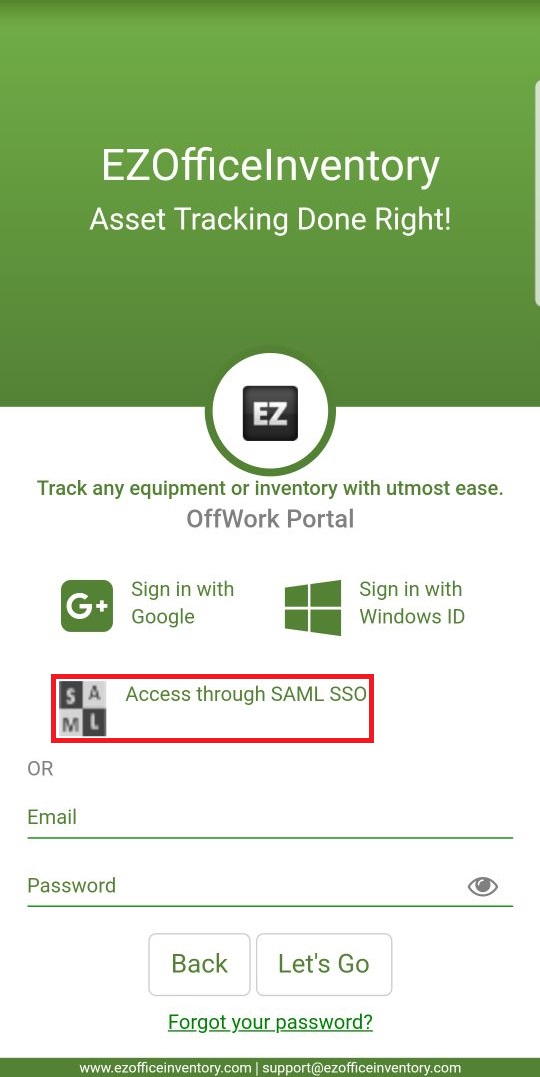
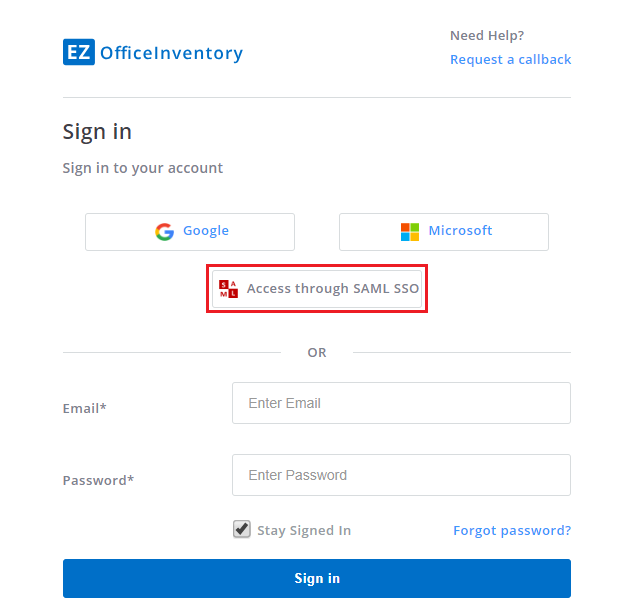
The following takes place when a user tries to login to a SAML enabled EZOfficeInventory account: – When the user goes to the EZOfficeInventory portal, they see the SAML access option. Below, you can see both the mobile app and browser versions:
– Clicking Access through SAML takes a user to SAML Provider’s page for authentication. – If the user is already signed in to the SAML Provider’s account (e.g. OneLogin) they’ll directly land into the EZOfficeInventory portal. – The email address of the user determines which EZOfficeInventory member they are. – A user who isn’t added to an EZOfficeInventory’s account under Members tab, but accesses that EZOfficeInventory account for the first time via SAML, is added as a new staff user.
Note: In a scenario where users might want to use SAML as the only authentication option in EZOfficeInventory, you can disable other options from Company Settings -> Authentication.
For LDAP integration with EZOfficeInventory, click here.
Click here to set up SSO for EZOfficeInventory and Microsoft ADFS
6. FAQs
Q. How to verify the information while setting up SAML Integration for EZOfficeInventory? A. Following are some of the URLs that you may require during the configuration process: –Sign On URL: https://<Your Company’s Subdomain>.ezofficeinventory.com/users/sign_in –Identifier/Issuer: https://ezo.io/ezofficeinventory (Note: Do not enter your subdomain with it) –Assertion Consumer Service URL: https://<Your Company’s Subdomain>.com/users/auth/saml/callback
Q. What if the Identity Provider asks for 4 attributes e.g. First Name, Last Name, Email and Principle Name? Will it matter as EZOfficeInventory only looks for First Name, Last Name and Email?
A.The extra attribute will not be an issue. However, while configuring, you’d most probably have to map the exact attribute names of the first name, last name and email fields that are provided by the Identity Provider in the Settings -> Add Ons page.
Q. Sensitive information exchanged in the SAML assertion? A. No, only the email address is sent.
Q. How to paste your SAML SSO Certificate? A. During the EZOfficeInventory’s configuration process, paste the certificate in the field in between the following marks: —–BEGIN CERTIFICATE—– Paste certificate details here —–END CERTIFICATE—–
Q. When do I need to update the SAML SSO Certificate in my EZOfficeInventory account?
A. You will need to update the SAML SSO Identity Provider Certificate in the following three instances:
You switched your account within the existing Identity Provider.
You have changed your online Identity Provider. Let’s say, you moved from One Login to Okta.
You have switched to the self-hosted ADFS server. This is useful when you need login access for third party applications not owned or managed by external cloud based Identity Providers e.g. One Login, Okta etc.
Q. How do I update the SAML SSO Certificate in my EZOfficeInventory account?
A. You can update the SAML SSO Certificate by carrying out the steps listed below:
You need to first create a backup of the existing Certificate. Go to Settings → Add Ons → SAML Integration → Identity Provider Certificate. Copy the existing certificate, paste it onto a Notepad and save it in your computer.
Once you’ve created a backup of the existing certificate, replace it with the newer certificate you get from your new Identity Provider or ADFS. Hit ‘Update’ to save the changes.
Now, open a different browser (e.g. if you’re using Chrome, open Firefox and vice versa) and verify if the SAML integration is working.
If the SAML integration does not work, go back to the original browser and revert the changes you just made.
Q. Someone at your organization tried accessing your EZOfficeInventory portal through SAML, but could not log in. To fix this, verify that your integration has been set up correctly. A. A common issue is not having the Last Name and Email attributes configured in your SAML Set Up. To diagnose this: 1) Make sure EZOfficeInventory is getting the Last Name and Email for members. The relevant options are available under Settings → Add Ons → SAML. 2) Look for typos in SAML Attribute Names added in EZOfficeInventory Settings. For example, if your SAML Attribute for the Last Name is last_name, it should be entered as such. 3) In most cases, the parameters/attributes are mapped in your preferred identity provider configuration settings, otherwise, your service provider will ask you to map them.
Q. While logging in clients may receive the following error message “Client is unable to login via SAML due to error: Could not authenticate you from SAML because Current time is earlier than notbefore condition”. This issue occurs because of notbefore time and can be resolved by appending “clock drift” value to 1 in SAML settings.
Share your Queries
Log into your account to try this out and let us know what you think at support@ezo.io.
Was this helpful?
Thanks for your feedback!
Achieve Higher Asset Control with EZOfficeInventory
Cloud-based asset management software that helps minimize costs with efficient asset organization and tracking.