
You can easily categorize and organize items in EZOfficeInventory using groups. This blog is a continuation of our earlier blog that explains how groups are set up and used in depreciation, custom fields, item filters, alerts, and document attachment. This blog will discuss how groups are used in setting up.
1. Using Groups to Add Items in Bundles
A bundle is a flexible combination of items, which acts like a checkout list making it easier to check items out together. Groups can be used to add items to bundles. The advantage of adding items from groups to bundles is that the system will automatically select available items and add them to the cart when the bundle is checked out. Additionally, if you wish to further specify the items, then you can swap these items out with other items in the groups specified. To learn more about bundles, click here.
To assign groups to bundles, click on More from the left-hand side navigation bar, then go to Bundles → Add Bundle → Under ‘Items in the Bundle’ → Click ‘+ Add Bundle Line’. Choose ‘Advanced (Assets)’ against the Type field and specify details of how many Assets you want to add from a particular group. See image below:

Note: The same method can be applied when adding Advanced (Asset stock) or Advanced (Inventory) items to a bundle.
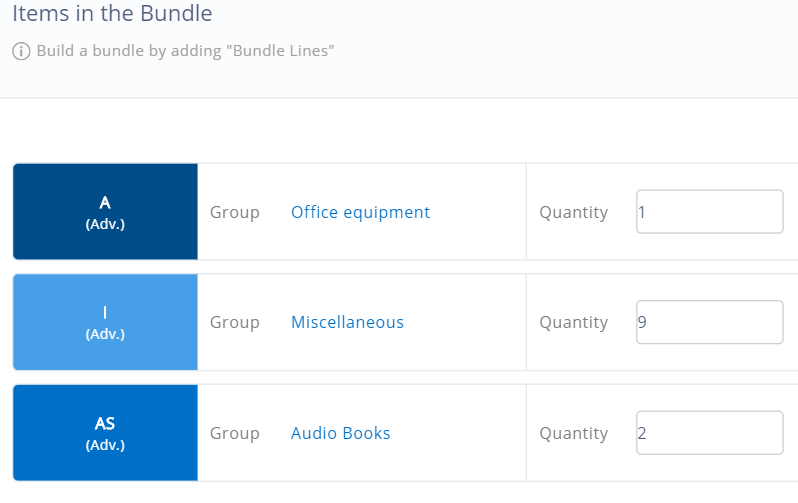
To help us understand how this works, let’s take an example of the following bundle. This bundle has the bundle line items containing 1 asset stock item from the group ‘Office equipment,’ 9 inventory items from the group ‘Miscellaneous’ and 2 asset stock items from the group ‘Audio Books.’ See image below:
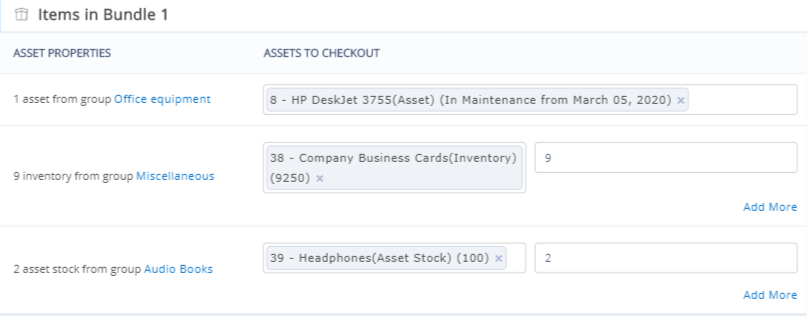
When this bundle is added to a cart for checkout, 1 available asset from the group ‘Office equipment’ will be added, 2 available asset stock items from the group ‘Audio Books’ and 9 inventory items from the group ‘Miscellaneous’ will be added.
To check out this bundle you will need to first add it to the cart by clicking ‘Done’ and then hitting the ‘Add To Cart’ button on the right of the bundle detail page.
Once you click the ‘Add To Cart’ button, you will get the option to swap assets with other available items in the group before adding them to a cart. Similarly, you can edit the quantity of asset stock and inventory items too. So, for the above example, you will get the following page:
To swap the asset, you first have to remove the existing asset by clicking the ‘X’ symbol. Then you can search within the same group for another asset to add.
You can then proceed to add you items to your cart. To learn more about Carts, click here.
2. Setting up Recurring Services on Groups
Recurring services are set for Groups, such that all items in that group will have the recurring service take place for them. Recurring services can be enabled from Add ons → Advanced Services and Maintenance → Recurring Services. To learn more about setting up recurring services for groups, click here.
3. Setting up Service Triage on Groups
You can choose to send your assets/asset stock automatically into service for a defined period of time once they are checked-in, using the service triage feature. To enable this feature, go to Add ons → Advanced Services and Maintenance → Service Triage. Once you enable the Service Triage feature you can either choose to:
-
- Triage assets of all groups.
- Triage assets of selective groups.
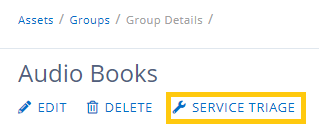
If you choose to triage assets for selective groups, you will need to enable or disable the Service triage for each group. To do this go to Groups → Select a Group → Click ‘Service Triage’ button and set it to enabled/disabled for the Group. To learn more about the service triage feature, click here.
4. Using Groups in Work Orders
When creating work orders (tasks for employees), you can associate them to groups. For example, you can assign an employee to perform a software upgrade for all items present in the group ‘Audio Books.’ This can be done when creating a work order from the left-hand side navigation bar. Go to Work Orders → Add Work Order.
You can also see details of work orders associated with a group from within the groups’ detail page. Clicl on Groups from the left-hand side navigation bar and then Select group name → click on the ‘Work Orders’ tab.
To learn more about work orders and associated tasks to groups, click here. You can enable Work Orders from Add ons → Work Orders.
5. Using Groups to Set up Access Control Rights for Users
For larger teams, you may need to restrict access to items according to departments, locations, and designation of employees. This is where our Advanced Access Control settings come into play. To learn more about setting up advanced access control, click here.
There are three ways to restrict access to users under Advanced Access Control i.e. by groups, by locations and by both groups and locations (see image below). These can be enabled from Settings → Company Settings → Policy → Access Control → Choose ‘Advanced’ → Go to ‘How do you want to restrict access’.
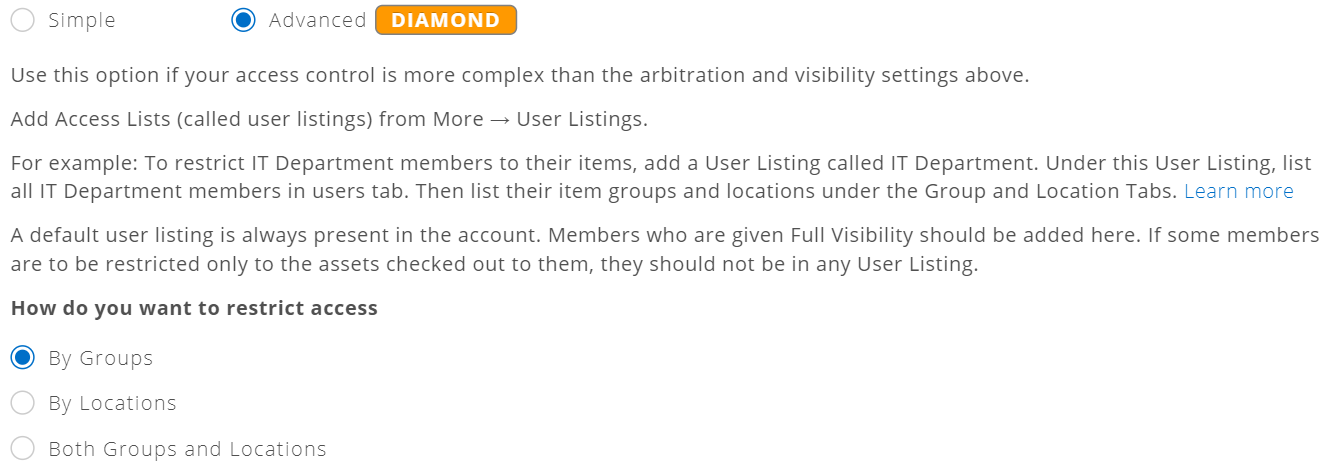
We’ll discuss restricting user access ‘By groups’ and ‘By groups & locations’ below:
5.1. Restricting Access by Group
This will allow members of certain user listings to only view items in the groups they have access to. To do this you will first create a user listing and assign groups of items to it. Members in that user listing will only have access to the items in the groups assigned to their user listing.
5.2. Restricting Access by Groups and Locations
In case you have multiple offices in different locations, you may want the employees to only access relevant items at their location only. For example, employees in the New York office should only have access to items grouped as ‘Laptops in New York’. To do this, assign both groups and locations to the user listing.
Learn More on User Access Control Settings.
Have Feedback About our Asset Tracking Software?
EZOfficeInventory is the leading asset tracking software used by SMBs all over the globe.
For more assistance, drop us an email at support@ezo.io.


